
The health benefits of sprouts are numerous and everybody can have these fresh greens in a matter of days. Even in the dead of winter, you can have fresh greens with this micro-gardening project. Here’s how to grow sprouts indoors.
What You’ll Need
1. Seeds or Beans. Try lentils, alfalfa, mung beans, clover, radish, soy beans, broccoli, pea, chick pea, sunflower, and fenugreek. Purchase seeds that are sold expressly for sprouting. Seeds that are intended for outdoor planting may be treated with pesticides or other harmful chemicals; avoid them when you grow sprouts indoors. 
2. Cheesecloth.
3. Scissors to cut the cheesecloth.
4. Wide-mouth mason jar. I use the quart size, but if you have smaller ones, then simply add less seed.
5. Mason jar ring lid. You only need the threaded ring to hold the cheesecloth in place.
6. Cloth for covering jar for a few days.
7. Tap water.
8. Small bowl. This will help you invert the jar.
To Disinfect or Not to Disinfect
In recent years, there have been reported incidents of salmonellosis and E. coli found in a small percentage of non-organic sprout seeds. For that reason, I wanted to offer a disinfecting step for those interested. This step comes before the sprouting process.
Disinfect the seeds by placing them in 1 cup of hot tap water and adding 1 teaspoon of bleach. Let the seeds soak for 15 minutes in the solution and then rinse them thoroughly before you move on to sprouting.
 Another option is to replace the bleach with hydrogen peroxide, which is very antiseptic. However, this method doesn’t have as much science behind it to show whether it is as effective as bleach. Whatever you decide, be sure to rinse your sprouts thoroughly with water before sprouting and before eating.
Steps to Grow Sprouts Indoors
1. Cut a piece of the cheesecloth (doubled or tripled over) that’s large enough to drape a bit over the top of the mason jar.
2. Measure out about 1 1/2 Tablespoons of seed (and you can always mix seeds, too), place the seeds into the jar, and then fill it about halfway with cool water. Lay the cut cheesecloth over the top of the jar and use the ring lid to secure it onto the top.
3. Swirl the water all around to rinse the seeds off and pour the water out — right through the cheesecloth. Refill the jar (through the cheesecloth again) with fresh water about 1/2 to 3/4 full. Let the seeds soak for 8-12 hours (no sunlight). I usually just do this first step before I go to bed at night, then they’re ready to go the next morning.
4. Pour the water out of the jar. Add more water to the jar, swirl and rinse the seeds, and pour the water out. The seed or sprout will not sit in water again from this point on. Spin the jar so that the seeds are distributed all over the sides.
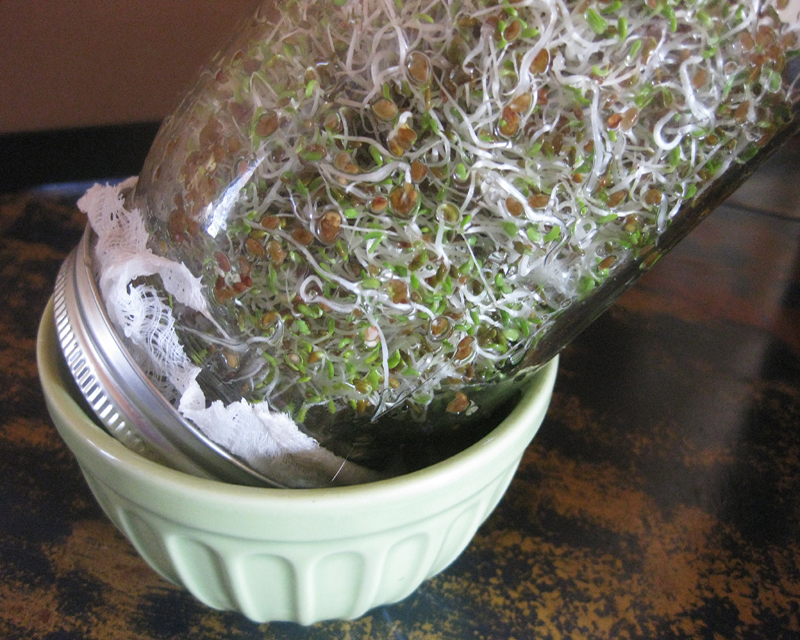
5. Prop the jar up at an angle in the bowl so that any excess water drains away from the seeds (and into the bowl). Keep it out of the sunlight by placing a cloth over the entire jar.
6. For the next 2-6 days, rinse your sprouts 2-3 times a day and then invert the jar into the bowl. Around day 5 — or sooner depending on the seed type — take the cloth off of the jar so the sprouts “green up.” Don’t place them into the direct sun (or they’ll cook and become mushy). Just let them have the light and they get color.
7. To harvest, remove the lid from the jar and pour them into a large bowl. Add enough cool water to allow the sprouts to float around. Using your hand, swish them all around the bowl to loosen the hulls from the little plants. Attempt to remove as many hulls as you can to keep excess moisture away for storing.
8. Place the sprouts onto paper towels to soak up as much moisture as possible. Put them into a plastic storage bag or container and keep it in the produce drawer of your refrigerator. Storage life varies, but I prefer to use them within the week.